Table of Contents
- 🚧 Why Pi-hole?
- 🥧 Installing Pi-hole
- 🛑 Adding Blacklists
- 📋 Configuring Devices to Use Pi-hole
- 🙋 What's Next?
🚧 Why Pi-hole?
I've been using an ad blocker in my web browser for as long as I knew they existed. They do the job they're supposed to do, they do it very well, and they often do it better than the solution outlined below. The problem is that they only work in the browser; they won't block application telemetry nor will they work on mobile devices. I wanted a solution that would work for all devices on my local network. Enter Pi-hole.
Originally designed to work with the Raspberry Pi, Pi-hole is a DNS sinkhole that works by intercepting DNS requests and checking if they match a list of blacklisted domains. If the requested site is on the list, the Pi-hole returns null, effectively saying 'there's no website at that address.' Pi-hole can do a bunch of other things like handle DHCP and create local DNS, but here I'll be focusing on setting it up as a DNS sinkhole. I'll be running Pi-hole in a Docker container on my repurposed laptop server
It's important to note that Pi-hole does not provide network security. Network security is a job better suited for a Firewall or DMZ.
🥧 Installing Pi-hole
With Docker installed, it's time to navigate to DockerHub and find the official Pi-hole image.
In the home directory of veloserver, I made a new directory for the Pi-hole files and opened a new docker-compose.yaml file in nano:
mkdir pihole
sudo nano docker-compose.yaml
I copied the provided docker-compose file into nano (right-clicking in the editor will paste the contents of the clipboard). There were a few small changes that needed to be made to this file: I changed the TZ to America/New_York, uncommented the WEBPASSWORD field, and added a password. Passwords are not (and should not!) be stored in the docker-compose.yaml file, and are instead stored in a .env file sibling to it.
Every time I have reached this stage of the installation, I've been greeted with an issue related to port 53, seemingly caused by Ubuntu's systemd-resolved service already running on port 53. I found a post outlining a solution, and run the following commands:
systemctl disable systemd-resolved.service
systemctl stop systemd-resolved
The systemd-resolved service is a Linux system service that provides DNS resolution but since we're going to be using Pi-hole (which forwards DNS requests that aren't blocked to another resolution service), we can disable and stop the service without worry. With the systemd-resolved issue resolved, it's time to run the docker-compose file:
sudo docker-compose up -d
This command spins up the container in detatched mode, which just means that it runs as a background process rather than taking over the terminal. From here we should be able to run the following command to make sure that the new Pi-hole container is indeed up and running:
sudo docker ps
After a restart, it's now possible to access the Pi-hole admin panel from any web browser on the network http://192.168.1.100/admin/ (update IP address as necessary) by using the password defined earlier in the docker-compose.yaml (or .env) file that was used to build the Pi-hole container.
🛑 Adding Blacklists
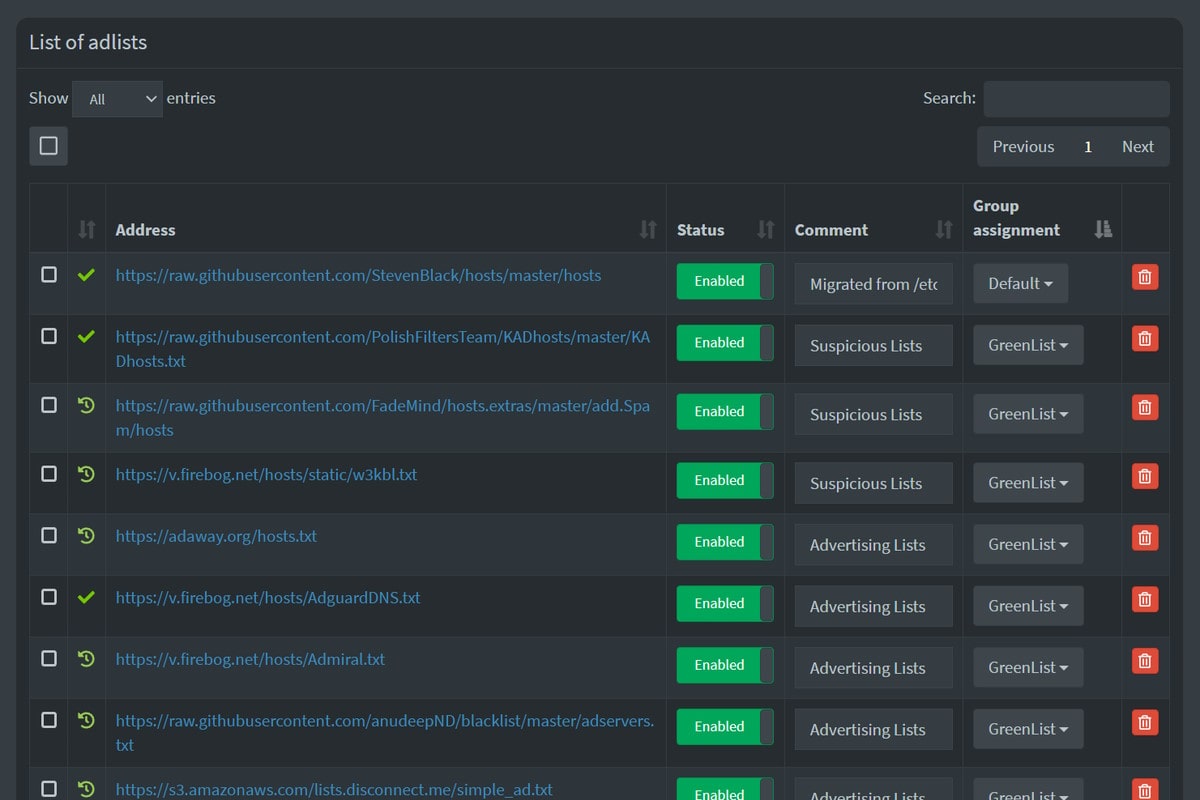
Once in the admin panel, the next step is to update the blacklists. This step is completely optional, as Pi-hole does come with a default list, but doing so will vastly increase the number of IP addresses that the Pi-hole will block. Adding a new list is as easy as navigating to the Adlists section in the navigation and adding an address with a comment.
The simplest way that I found to add sites was to use the curated lists present on The Firebog. Blacklists here have different categories: green lists are the least likely to interfere with normal browsing, blue lists more aggressively block sites (I had one completely block Amazon), and lists with strikethrough text are deprecated or give false positives. Using just the green lists there are over 750,000 domains blocked on my network and I don't notice any negative effects when browsing. It's worth noting that it's not perfect - the YouTube app will still deliver ads to my phone, but I don't use the app often and they are taken care of in my desktop browser with uBlock origin.
 32 imported adlists are protecting devices on my home network from unwanted ads.
📋 Configuring Devices to Use Pi-hole
Now that the Pi-hole is setup, it's time to tell the devices on our network to use it as their DNS provider. There are two options here and each has their own pros and cons:
- Configure each individual device's DNS settings
- Tell the router to resolve all DNS queries through the Pi-hole
Pointing each device to the Pi-hole will collect more granular data about which device is making which query. Configuring the router is much simpler, but not all routers can be setup with this functionality. I've gone with a combination of both soltions: a lot of my devices have their connections manually configured, and I also point my home router (an Archer C7 and flashed with the OpenWRT firmware) to the Pi-hole. This makes sure the network is covered and also lets me know when different devices are phoning home at different intervals.
🔀 On My Router
At home, I have an TP-Link Archer C7 and it has been flashed with the custom firmware OpenWRT. This is the process I followed to tell my router to use the Pi-hole for DNS requests:
- Click Network > Interfaces
- On WAN, click Edit > Advanced Settings
- Uncheck the Use DNS servers advertised by peer option, add
192.168.1.100to Use custom DNS servers and save - Click on Interface has pending changes and Save & Apply.
- System > Reboot from the navigation bar to ensure that all of the settings are active.
- The network should be covered by PiHole!
🖥️ On My Windows Desktop
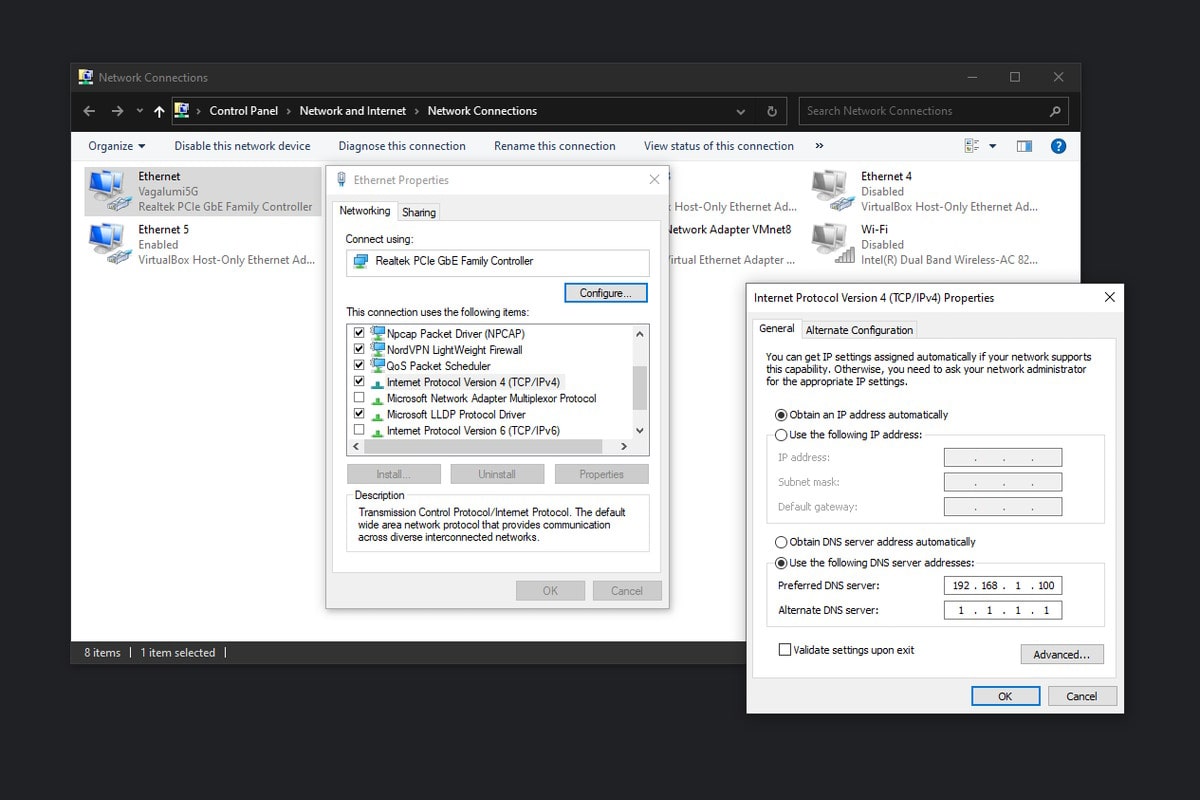
 Custom DNS settings tell my desktop to use the Pi-hole for its DNS requests.
In the Network Connections control panel, go into the properties of the connection to the router and disable IPv6. Then go to the IPv4 properties and change the Obtain DNS server address automatically to Use the following DNS server addresses. In Preferred DNS server, put in the address of the Pi-hole (192.168.1.100 in this case). Windows won't allow you to input the same address as the Alternate DNS server, so I set it to 9.9.9.9, but if I had a second Pi-hole setup, this is where that would go. This ensures that if my server were to shutdown or stop working for some reason that my desktop would still be able to connect to the internet.
🙋 What's Next?
Setting up a second instance of Pi-hole for redundancy is a great next step. Redundancy is a super important concept and being able to practice it on my home network with Pi-hole is a great illustration of how and why it can be implemented. It's not as simple as creating a second instance because I would want to ensure that both Pi-hole instances were synced with the same blocklists and that any changes made to one Pi-hole would propogate to the other.
The other thing I want to do is setup Unbound DNS. Unbound is recursive DNS resolution, which means that it queries authoritative DNS servers to resolve queries directly. It also caches the responses, making subsequent requests to the same address resolve locally rather than across the internet.


